Move4Live – Manual
Version 1.1.1 · May 2026
This manual covers the installation, setup, and operation of Move4Live, the Max for Live device that builds a ready-to-play session framework in Ableton Live or on the Push 3 Standalone at the press of a button – just like you know it from the Ableton Move.
1 Requirements
or Ableton Push 3 Standalone
2 Installation
2.1 Automatic Installation (Windows)
- Extract the ZIP file to any folder.
- Double-click the installer file
install_windows.bat.
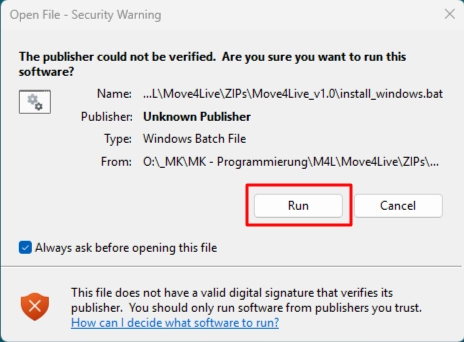
Windows 11: security warning.
- Confirm the suggested Ableton User Library path by typing “y” for “yes”, or enter a custom path.
- If an existing installation is found, you will be asked to confirm overwriting it with “y”. Otherwise the installation process will be aborted.
The installer copies all three components to the correct locations automatically. Continue with Chapter 3, “Setup in Ableton Live”.
2.2 Manual Installation (Windows & macOS)
Extract the ZIP file to any folder and copy the following files manually to the corresponding locations in your Ableton User Library.
2.2.1 M4L file “Move4Live.amxd”
Device/Move4Live.amxd → User Library/Presets/Audio Effects/Max Audio Effect/
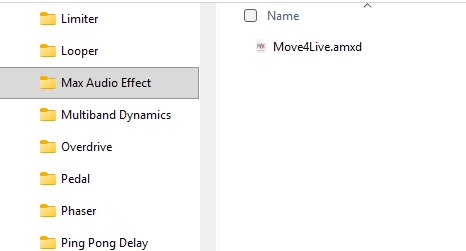
Move4Live.amxd belongs in the “Max Audio Effect” folder of your User Library.
2.2.2 Preset file “PunchGlue.adg”
Device/PunchGlue.adg → User Library/Presets/Audio Effects/Audio Effect Rack/
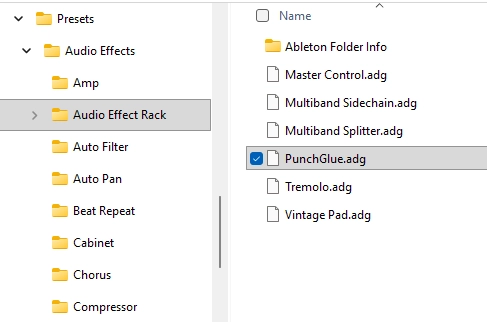
PunchGlue.adg belongs in the “Audio Effect Rack” folder.
2.2.3 Remote Script files
Remote Script/init.py and Move4Live.py → User Library/Remote Scripts/Move4Live/
You may need to create the Move4Live folder first if it does not exist.
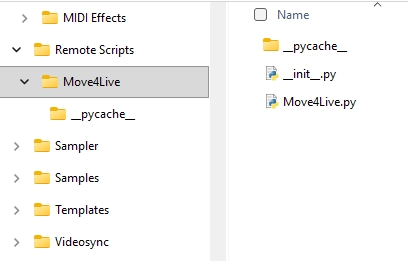
The “Move4Live” folder inside Remote Scripts contains “__init __.py” and “Move4Live.py”.
2.3 Installation on Push 3 Standalone
Installation on the Push 3 Standalone is done via the Ableton Live browser on your computer, where Move4Live must already be installed. The Push 3 must be connected to your computer during this process.
- Drag the entire
Move4Livefolder fromUser Library/Remote Scriptsin your desktop Live toPush/User Library/Remote Scripts. You may need to create theRemote Scriptsfolder on the Push first if it does not exist.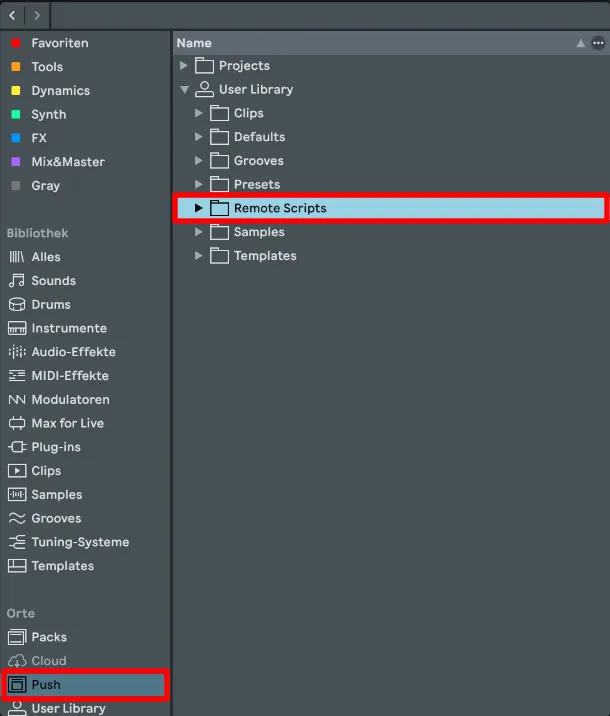
Live 12 – target folder for the Remote Scripts on the Push.
- Drag
PunchGlue.adgfromUser Library/Presets/Audio Effects/Audio Effect Rackin your desktop Live toPush/User Library/Presets/Audio Effects/Audio Effect Rack.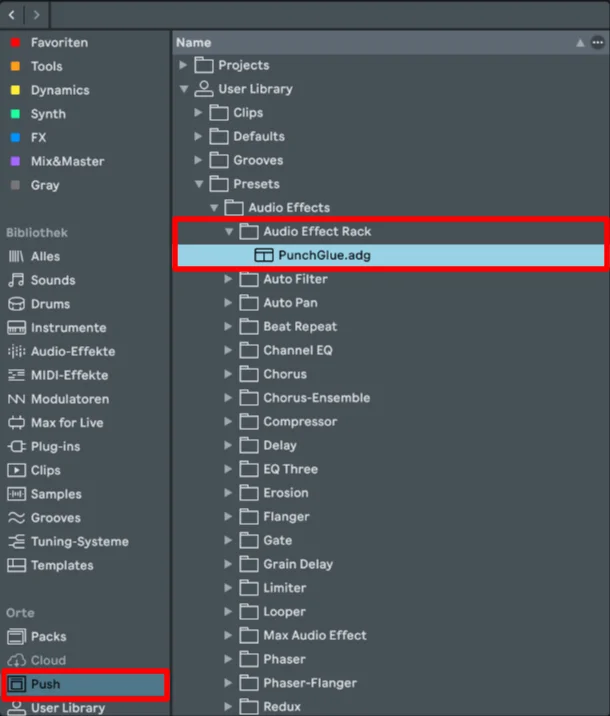
Live 12 – target folder for “PunchGlue.adg” on the Push.
- Drag
Move4Live.amxdfromUser Library/Presets/Audio Effects/Max Audio Effectin your desktop Live toPush/User Library/Presets/Audio Effects/Max Audio Effect. You may need to create theMax Audio Effectfolder on the Push first if it does not exist.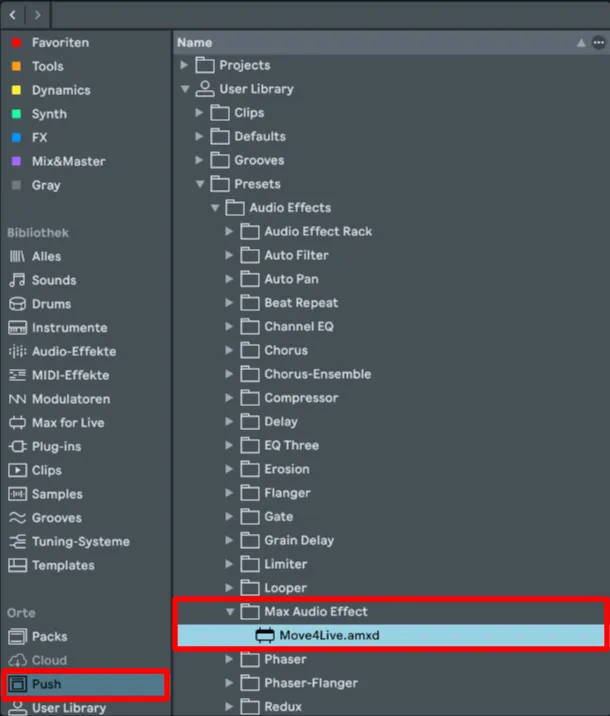
Live 12 – target folder for “Move4Live.amxd” on the Push.
- Restart the Push 3 in Standalone mode so it recognizes the newly installed Remote Scripts.
- Navigate to Setup (gear button) → MIDI.

Push 3 – “MIDI” page in Setup (gear button).
- Select Control Scripts under Settings (Encoder 1).
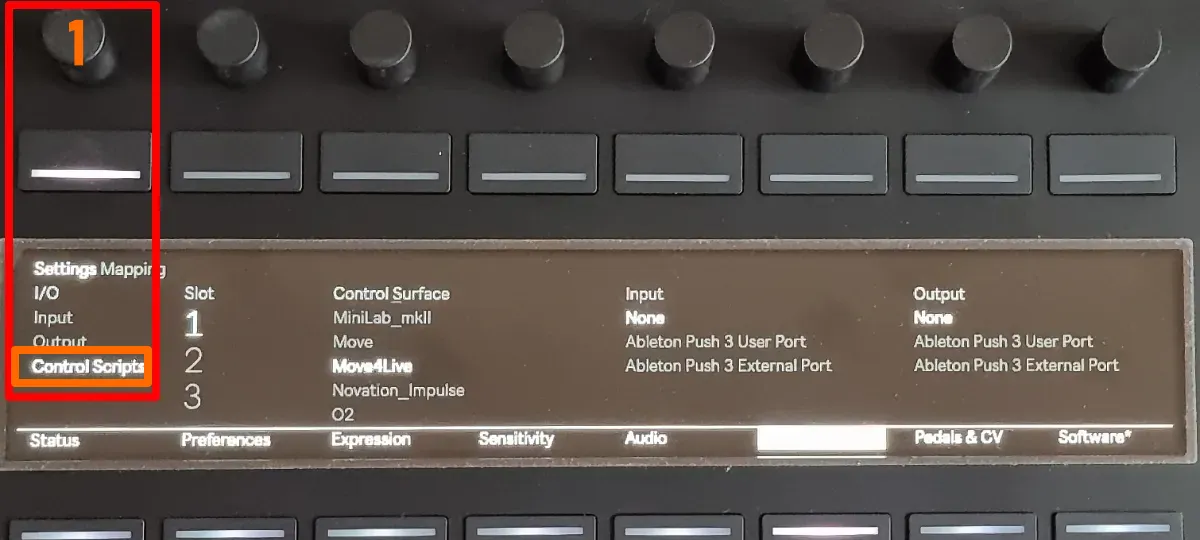
Push 3 – Setup MIDI page with I/O setting for “Control Scripts”.
- Choose a Slot (Encoder 2), then select the Move4Live script installed in step 1 under Control Surface (Encoder 3).
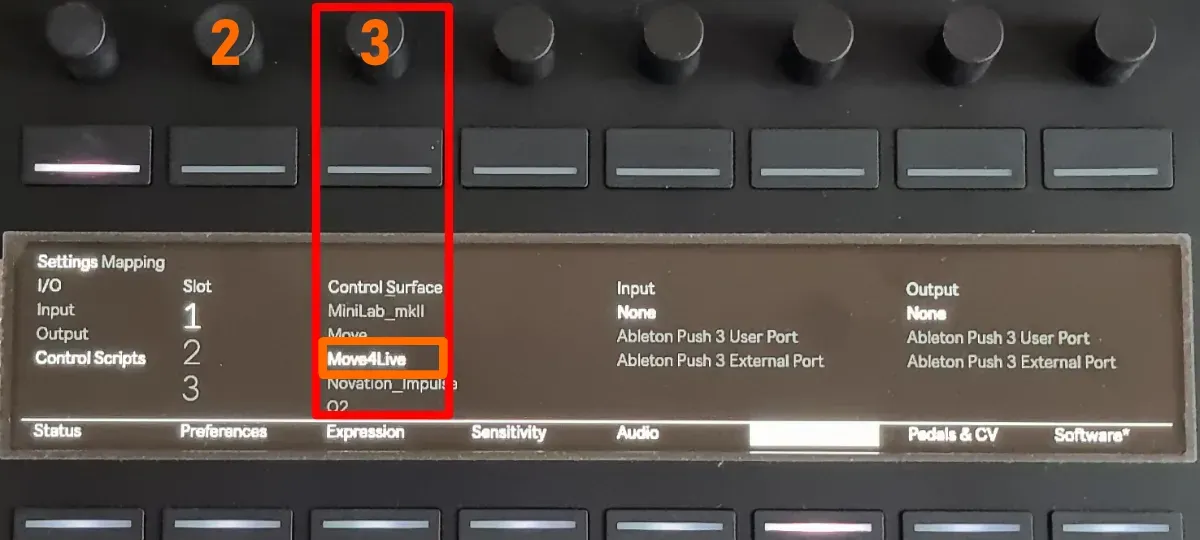
Push 3 – Setup MIDI page with Control Surface selection "“Move4Live”.
Move4Live.amxd directly via the Push 3 browser with the Main track selected: Device → User Library → Presets → Audio Effects → Max Audio Effect. The desktop setup described in Chapter 3 is not required in pure Standalone operation. Continue with Chapter 4, “Controls & Operation”.
2.4 Default User Library Paths
- Windows:
%USERPROFILE%\Documents\Ableton\User Library - macOS:
~/Music/Ableton/User Library - Push 3 Standalone: In the Live browser under
Push/User Library
Move4Live selected as a control surface in slot 2. Move4Live.amxd in the User Library under Presets → Audio Effects → Max Audio Effect. The device on a non-Main track: only the warning is visible.3 Setup in Ableton Live

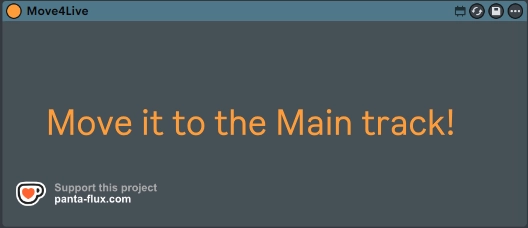
Move4Live.amxd onto the Main track of your set.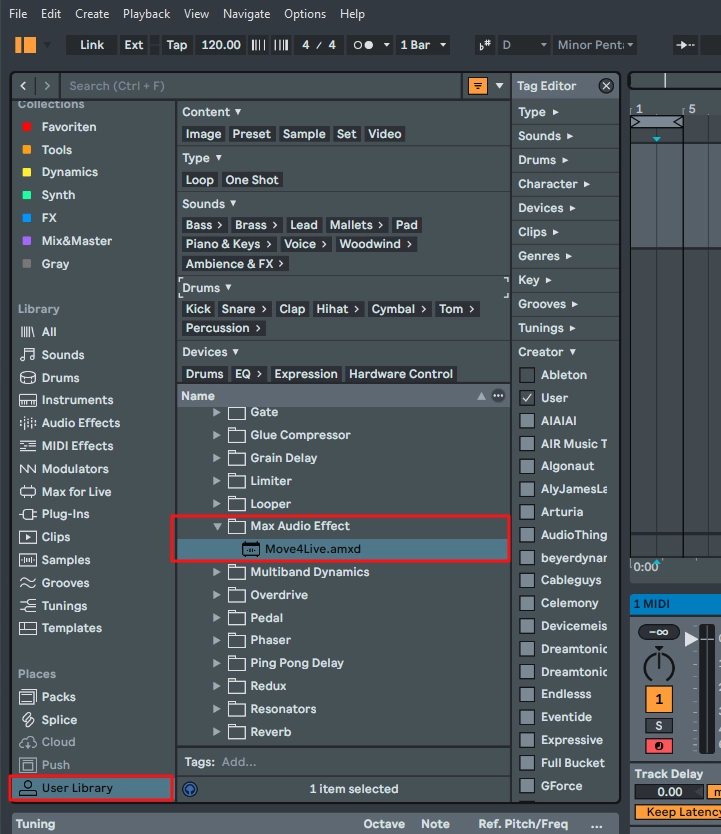
The Move4Live device with all controls on the Main track.4 Controls & Operation
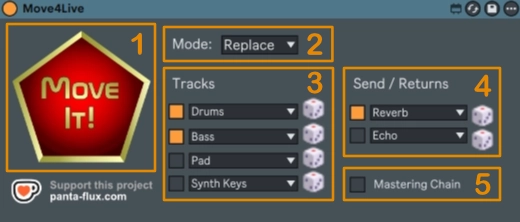
4.1 The “Move It!” Button
As the motto “Move It!” suggests, the pentagon logo is the main trigger. One click builds the session framework according to the current settings – just like starting a new set on the Ableton Move.
One exception: any devices already on the Main track are left untouched, preserving monitoring and mastering devices you may have set up there.
4.2 Modes: “Replace” / “Add”
Unlike the Ableton Move, Move4Live supports two distinct modes:
- Replace – removes all existing tracks in the set and replaces them with the new randomly chosen tracks. Just like the Ableton Move.
In Replace mode, existing tracks (except devices on the Main track) are deleted permanently. Move4Live assumes you know what you're doing.
- Add – adds the new randomly chosen tracks alongside any tracks already in the set.
These two modes let you either start a set from scratch or gradually expand an existing one with randomly chosen tracks.
4.3 Instrument Tracks
The four slots (e.g. Drums, Bass, Pad, Synth Keys) determine how many instrument tracks are built and what kind they are. Each slot can be enabled (orange) or disabled (grey) via its checkbox. The dropdown menu lets you choose the instrument category; the preset within that category is selected at random from your installed Ableton library. On all tracks with the category “Drums”, the Ableton Drum Buss is automatically added as a second device after loading the drum preset. This gives your drums a more polished sound right from the build, with no extra manual steps required.

A Drums track with the automatically added Drum Buss.
4.4 Dice Buttons (Reroll)
The dice buttons to the right of each category menu add another layer of randomness. If you’re not happy with a sound, simply use these buttons to roll a new random preset for that individual track from your last “Move It!” build, without touching anything else. You can also switch to a different category before rolling.
4.5 MIDI Input Channel
From version 1.1 onwards, each instrument track can be assigned its own MIDI input channel. This is useful when working with external sequencers that address different tracks on separate MIDI channels, or when jamming with friends using multiple MIDI controllers on specific channels. The reset button sets all slots back to the default value “All Channels”.
4.6 Send/Return Tracks
Two slots for return tracks with randomly chosen effect presets drawn from a curated selection (chosen for compatibility between Live 11 and Live 12). Each slot has its own dice button for individual re-rolls – including the option to switch to a different effect category beforehand.
4.7 Random Sends
The “Random Sends” option automatically assigns randomly chosen send levels to newly created instrument tracks for the return tracks built at the same time. The mode is non-destructive – existing send settings are left untouched. This gives you an immediate first impression of the randomly chosen return effects.
4.8 Mastering Chain
This option enables or disables the automatic creation of a mastering chain on the Main track, modeled after the default Main track of the Ableton Move: Punch Glue → Compressor → Analog Clip → Limiter.
4.9 Support Link
The support link below the “Move It!” button opens the Move4Live product page in an external browser. There you’ll find general information about Move4Live as well as a link to my Ko-fi page, where you can support the project and its continued development with a donation.
4.10 Push 3 Standalone
From version 1.1, Move4Live runs fully on the Ableton Push 3 Standalone since Push 2.4.
Once you have loaded Move4Live onto the Main track and switched into the device by pressing the button above the device name, it presents itself across four pages or banks, with all controls described above grouped logically:
-
MoveIt!: On this page, Button 2 triggers the “Move It!” button to build the new tracks. Encoder 2 selects the mode (“Replace” or “Add”). Buttons 3 through 6 enable or disable the individual instrument tracks (“Track 1” through “Track 4”), whose categories you set with Encoders 3 through 6.
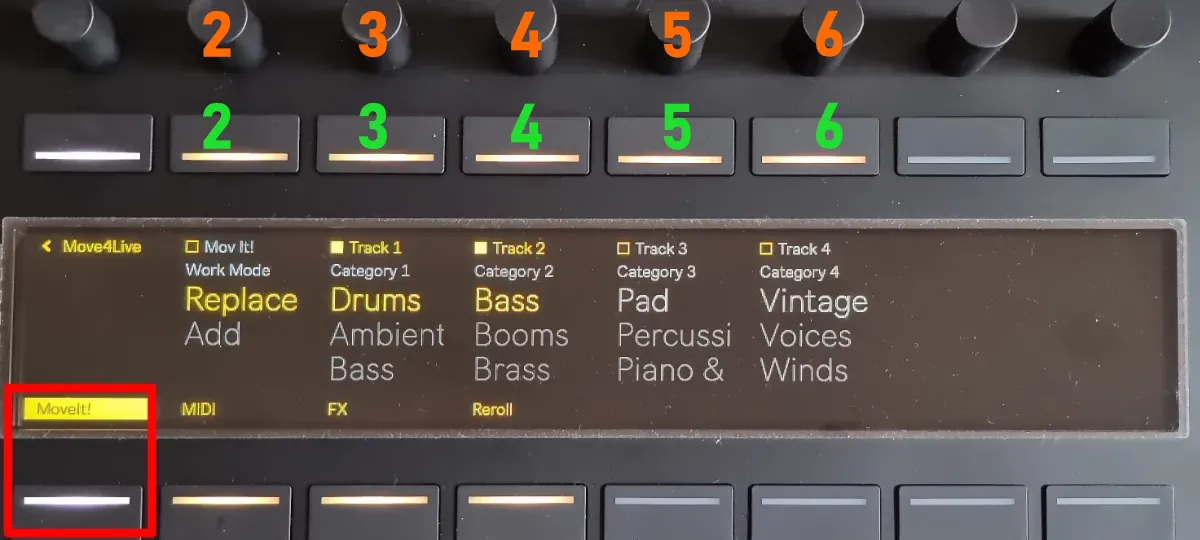
Move4Live on Push 3 – “MoveIt!” page.
-
MIDI: Encoders 3 through 6 let you assign a specific MIDI input channel to each of the instrument tracks to be created. Pressing Button 7 triggers the reset, which sets all MIDI channels back to the default “All”.

Move4Live on Push 3 – “MIDI” page.
-
FX: On this page, Buttons 3 and 4 enable or disable the two possible return tracks. Encoders 3 and 4 select the desired effect category for each. Button 6 enables or disables the “Random Sends” option for assigning random send levels to new tracks. Button 7 enables or disables the “Mastering Chain” option for creating the Ableton Move-inspired mastering chain on the Main track.
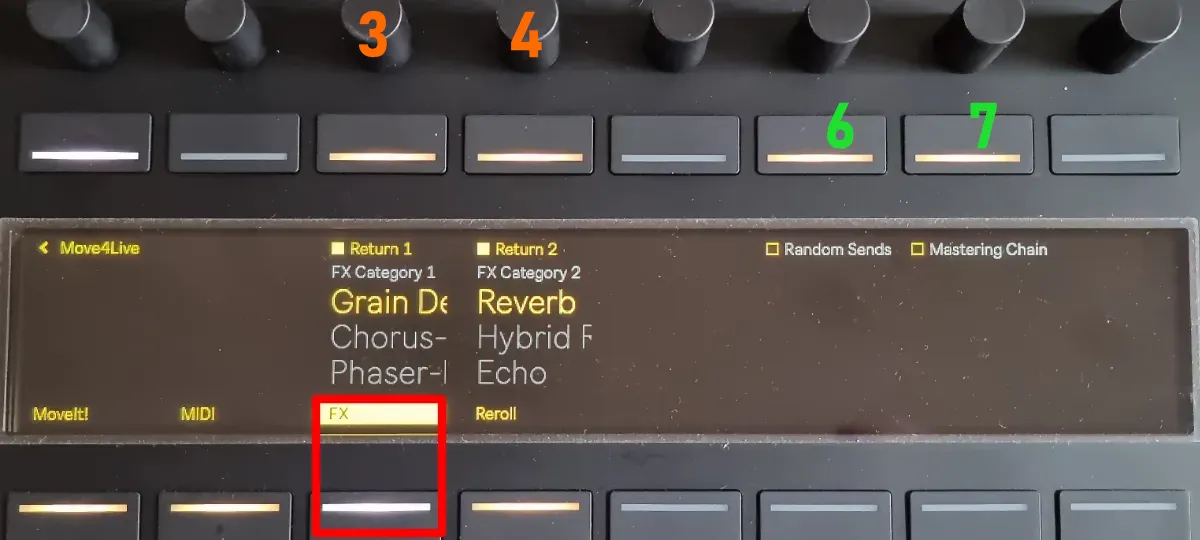
Move4Live on Push 3 – “FX” page.
-
Reroll: Buttons 3 through 6 roll a new random preset for instrument tracks 1 through 4 from your last build. Encoders 3 through 6 let you select a new category for the respective instrument track at the same time. Buttons 7 and 8 roll a new preset for return tracks 1 and 2. Encoders 7 and 8 correspondingly allow you to select a new effect category.
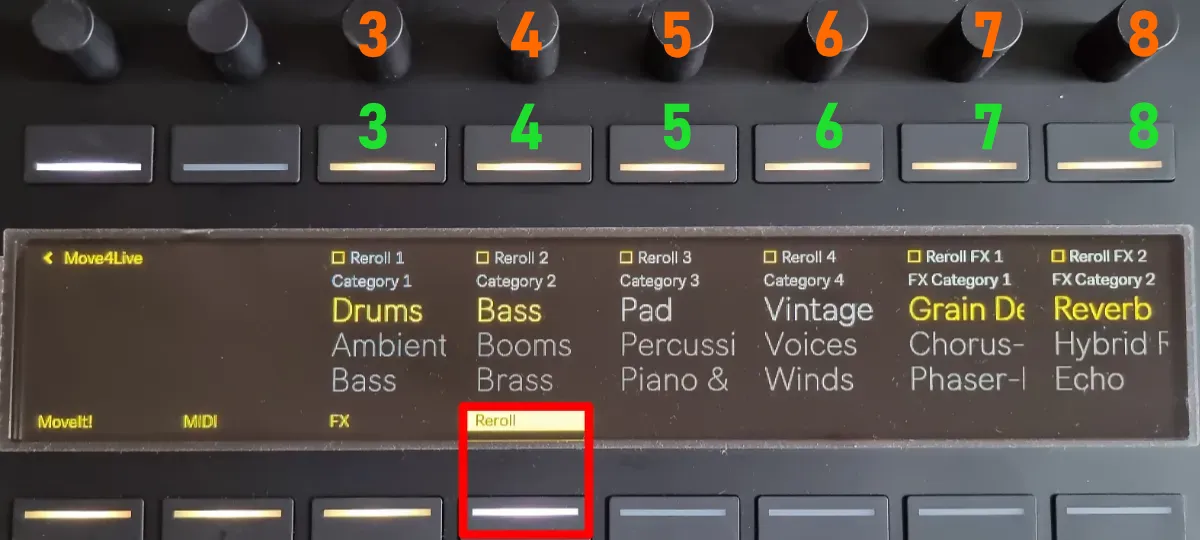
Move4Live on Push 3 – “Reroll” page.
5 Known Limitations
Move4Live is donationware. The download is free, but a voluntary contribution via Ko-fi – the artist-to-artist support platform – is always welcome. A coffee, a patch cable, whatever feels right. Every donation helps fund more tools like this one. Thank you!6 Support this Project